Who makes Quest metal detectors?
Quest are a metal detector manufacturer that was founded by metal detectorists. It’s aim was to couple detectorists with the most advanced yet affordable technology.
Quest describe themselves as passionate in the recovery of artifacts, coins, and other valuable items. The Quest line of metal detectors and accessories reflect not only cutting edge technology but also value.
Quest metal detectors and accessories are described as being in their “own league” as far as technology and affordability. Their detector designs incorporate the feedback from users.
The detectorists favourite features have been combined with Quest’s own unique features so together are a winning team.
Whether you hunt on land or in the water and no matter what type of treasure you are after, Quest say that they have you covered.
The Quest name in fact has been chosen from over 3000 potential names that were submitted by detectorists from all over the world.
Every year they sponsor metal detecting rallies to encourage more people to join the hobby. They also keep investing more than 30% of their revenue into developing the latest technology.
They seem to value their customers and dealers by delivering high quality metal detectors and accessories for them with great backup.
Current brilliant alternatives for their price points are Minelab XTerra Pro and the Nokta Makro Simplex+.
Where are Quest metal detectors made?
The Quest company within the metal detecting industry is comparatively new compared to some other manufacturers as their story and journey starts in the 2000s.
They are based in Los Angeles, California but also have an E.U. office located in Lippenhuizen, the Netherlands. Chinese developers have also been instrumental and are a huge part of this company.
Quest (originally called Deteknix) can be truely called and American-Chinese startup.
The company was rebranded because of a lawsuit by Deteknix and the First Texas Corporation.
Deteknix lost the law suit but the quality of what they were producing was in not impacted.
After the re-branding as Quest, the equipment continued to grow quickly in popularity both in US and in the UK.
The E.U. branch in Lippenhuizen, Netherlands provides a fast and efficient service for European regions.
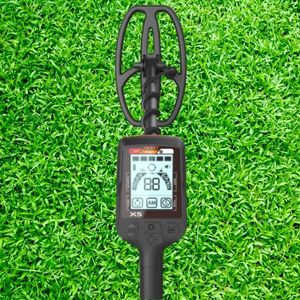
Quest X5 Metal Detector
The Quest X5 metal detector has to be one of the best kept secrets when looking for the best metal detector for beginners or the best metal detector for the money.
The irony is that it’s not been deliberately kept a secret and as people come into contact with this entry level machine, they quickly fall in love with it and question how it can perform so well at its price point.
Before we delve deeper into this gem of a machine, I have to say that in my opinion, you will not find a better performing metal detector in the sub £200 bracket.
In fact you can find the Quest X5 over on Amazon here.
It is incredible that at this price point, you get a superb DD coil, ground balancing, a built in torch for low level light, updateable software and built in rechargable batteries.
You can read more about the benefits of DD coils over Concentric coils in my article on metal detector coil types here.
Quest X5 metal detector specifications
Detection Platform : CVX Compact VLF
Display : 3 inch LCD backlit 60x45mm
Coil : Waterproof TurboD Blade 9×5 inch
Battery : 1000mAh Li-Po lasting 8-12 hours
Recharge method : Micro USB port
Audio Output : Built in speaker and 3.5mm wire earphone jack
Protection : Weatherproof/rainproof
Gauges : Battery level, Audio level, Target ID, Target ID bars x5, Depth, Sensitivity, Detect mode
Search modes : All Metal, Coin, Jewellery and Custom
Shaft design : Adjustable from 104cm/41″ to 55cm/22″
Operating frequency : Single 12.5 kHz
Target ID range : 1-99
Weight : 850g-947g depending on mid rod
Pinpoint function : Yes
Ground Balance : Yes
LED torch : Yes
What’s in the Quest X5 box?
So what do you get when you open the box? Well, you obviously get the control box pod, the search coil and a welcome coil cover (or skid plate) to protect it.
Items also include 3 shaft sections, the arm rest assembly and velcro strap, a micro USB charging cable and a coil bolt.
Assembly is really easy and can be completed in less than 10 minutes. One really nice feature which I can only assume was a suggestion from detectorists was including 3 shaft sections.
This allows the Quest X5 to be used by taller adults in the 3 section arrangement and also by younger budding detectorists in the 2 section arrangement.
The included velcro strap is also a nice little touch. There are a lot of detectors out there that don’t actually have one of these included. It saves you the faff of having to get one separately.
After the coil is attached to the lower shaft with the supplied coil bolt and washer, the coil cable is wound around the completed shaft, secured with a smaller velcro strap and screwed into the control pod.
At this price point, you don’t get headphones. You can use some that you already have.
Quest X5 Controls and Display
Quest X5 Display
The display screen on the Quest X5 is simplicity itself yet gives you all of the core information you need. The top of the screen (position A) shows the target ID bars.
These are used to indicate what targets you are accepting or rejecting. In the centre of the screen you have two large digits (position B) which indicate where on the Quest’s ID scale the target falls.

On the left hand side of the screen (position C) is a small battery icon that lets you know how much charge you have remaining. Each bar is approximately 2.5 – 4 hours depending on usage.
This can typically depend on if you are using the internal speaker and the LED torch for example.
Opposite this on the right hand side of the screen (position D) is the audio level output icon, either through the speaker or the headphones. (You will need to get these separately)
Located at the centre left hand side is the sensistivity indicator. These levels indicate 1, 2, 3 or H for High. (When increasing or decreasing the sensitivity, the level number is indicated in the centre digits.)
Opposite this on the right hand side is the target depth indicator. Segments indicate 2″, 4″, 6″ and 7+”. (When the pin point function is activated, a more accurate estimation is shown in the centre two digits.)
Depth indicators are only a rough guide however. The target size has a big impact on the estimation of depth. This is true on most all metal detectors.
Finally, the bottom of the screen shows the 3 search modes and also the search mode you have chosen and are currently using. To the far left, Jewellery, the centre, All Metal and the far right, Coin mode.
Quest X5 Controls
The Quest X5 controls are also very simple. There are 6 main buttons which control all of the available functions on the Quest X5.
Button 1 controls the Quest X5’s power on and off as well as scrolling through the menu options when powered on of course.
Button 2 activates the non motion pin point mode. Button 3 adjusts the sensitivity level up or down. Button 4 is used to set the ground balance of the Quest X5.
Button 5 on the left hand side of the control box increases or decreases the volume from the internal speaker or headphone jack. Button 6 on the right hand side activates the rear facing LED light.
You can read more about metal detector settings in my article here.
Quest X5 Target Identification
The top bar on the Quest X5’s screen at position A provides an estimation of a targets identity. This is only an estimation and it’s advisable to dig everything at first.
Hunting in the UK would dictate that at most, you would dig everything that you’re sure isn’t iron at first as many really sought after targets can be identified similar to trash.
This can typically include mistaking small, silver medieval hammered coins for foil as they often indictate the same on an ID scale. You can read more this in my article on Hammered British coins here.
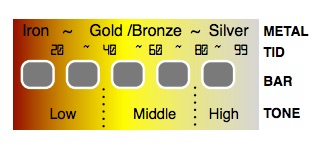
The Quest X5’s target identification ranges from 1 to 99 based on the targets conductivity. (You can read more about this in my article, metal detector discrimination and metal conductivity here)
Objects made of iron will typically appear at the lower end of the scale while highly conductive targets like copper or silver will appear at the upper end of the scale.
Identifying targets is something that takes practice so I eluded to earlier, dig everything at first and get used to the numbers and the audio. You will soon distinguish between good and scratchy signals.
Even good targets can be difficult sometimes depending on their location to other objects, depth and orientation. Typically, on a good target, the Quest X5 will ‘lock on’.
This means the target ID number may stay constant or only fluctuate slightly. Trash typically causes the Quest X5 not to lock on and the ID numbers to fluctuate erratically by +/- 20.
The target tones are split into 3 different sounds. A low tone, a mid tone and a high tone depending on the target conductivity.
Quest X5 battery charging
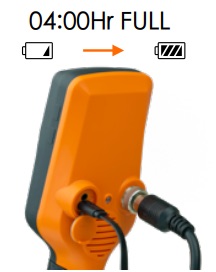
Battery charging on the Quest X5 is simple. Its internal Li-Po rechargable battery avoids the faff of having to exchange removeable batteries.
It charges fully in only 4 hours depending on the USB charging rating.
All you have to do is to remove the rubber, rainproof cover from the charging point and connect the micro usb into the housing.
The other end connects to any universal standard USB outlet.
Quest X5 Ground balancing
Mineralisation in the ground can give metal detectors a hard time and drastically effect how they perform. In extreme conditions, it can make the ground look like one huge target to a detector!
Ground balancing is a way that a metal detector ‘measures’ the ground and carries out mathematics to basically remove it and set a new ‘baseline’. This then simply removes or ignores the ground.
Extreme ground conditions to an unbalanced metal detector can give you erratic audio signals making it very difficult to detect and also a loss in detection depth.
To ground balance the Quest X5, you simply press and hold the ground balance button, (button 4) and then raise and lower (or pump) the search coil to the ground until it lets you know it’s balanced…..simple.
Quest X5 Metal detector price
The Quest X5 metal detector can be had for between £170 to £190. Amazing value for the build quality and technology inside it.
You can find a Quest X5 metal detector over on Amazon here.
Quest X5 Metal detector performance
As they say, a video is worth a thousand words! The Searcher magazine had a good day out with the Quest X5 and it performed brilliantly. It continues to blow everyone away with its performance!
Best value metal detector UK
Quest X5 Final thoughts
There very rarely comes along a metal detector that hits the detecting community by storm. Normally, when they do, they are an expensive, long awaited top end machine.
The Quest X5 came from nowhere and shook the entry level metal detector market share. This has had the result of displacing other somewhat more established brands with their entry level models.
In my mind, you would find it very difficult to find another machine at this price point to match it on performance.
If you are looking to break into metal detecting for the first time and are in the sub £200 price bracket, this is the detector own!
Alternative excellent single frequency machines would be the Minelab XTerra Pro and the Nokta Makro Simplex+ which are the best on the market for their price point!
Read my article on the Minelab XTerra Pro here and the Nokta Makro Simplex+ here.
The Quest X5 also has a bigger brother called the Quest X10 Pro with many additional features and is a step up the range. The Quest X10 is packed with more features and is still under £220 at Joan Allen Detectors.
The Quest range then continues upwards with the Q30 and Q30+.
Can you push the budget a little more to sub £250? Why not break into the world of multi frequency technology with the Minelab Vanquish 340? Read my article on the Minelab Vanquish range here.

The Evolution Pro Cut
The ultimate accessary for the serious metal detectorist. Super strong, stainless steel specially designed spade.