Metal detector settings can vary in number depending on the make and model of a detector. Usually, more basic models will have fewer settings, more advanced models will have more settings and be much more adjustable.
Common settings can include a volume control, sensitivity, pinpoint, patterns or modes, ground balance, discrimination, noise cancel and menu access.
How to use metal detector settings
Metal detector settings can be very daunting at first glance. Some older analogue metal detectors can even have knobs, dials and flickable switches.
Most newer models these days are digital and have push button controls. In this article, we’ll cover as many of the settings as possible and explain what these individual things do.

Depending on how much you spend on a metal detector will most probably have a direct correlation on the amount of settings you’ll find on it.
The more expensive and advanced, the more settings obviously.
Even if you have the same setting on a base model as you would on a more advanced model, the base model will have less adjustability within that particular setting.
A typical example of this would be the “sensitivity” setting. You would get this setting on a base model and a top end model.
The base model may only give you four increments to adjust your sensitivity level where as the top end model may give you ten increments for finer adjustment.
We’ll start off with the most obvious!
How do you use a metal detector?
On/Off
This may seem like a no brainer and yes, this button will turn on and turn off the power to your detector.
In some cases with particular makes and models however, when your detector is powered up, by pushing and holding in this button for a few seconds, the detector can perform what is known as a “factory reset”.
This means that if followed through, the machine will revert back to the pre-programmed settings that were initialised in the factory at manufacture.
This isn’t a disaster and many people do this as a matter of course every now and then to clear their machines.
This function will erase any programmes, discrimination patterns, tone pitches and tone breaks you may have put in.
Noise cancel
A noise cancel function is a very handy thing to have on a machine. Metal detectors are very sensitive things and don’t like to get upset by unwanted external interference.
This interference can come in many forms and typically can be from overhead or underground power cables and mobile phone transmitters amongst other things.
(You can read my article about troubleshooting metal detector problems here!)
The noise cancel function usually gets carried out by raising the search coil in the air and allowing the metal detector to scroll through several operating channels to determine which is the quietest channel for you to use.
This will make the detector run at its quietest level without any unwanted interference.

Ultimate Tactical Packs!
Carry everything you’ll need for a detecting day like a First Aid kit, detector spares, finds boxes, batteries, snacks and drinks to rehydrate.
Never forget anything again with a belt pack!
A detector without this function may suffer from interference which will be apparent from hearing lots of pops, crackles and noise.
Some machines will have buried in their menu systems a function to “frequency shift”. This is a very limited way of performing the same function manually but with much less adjustment.
Again, the amount of noise channels can differ from a base machine to a top end machine.
Ground balance
Some basic machines or base models will have ground balance but it may be fixed at the factory and not have the ability to be adjusted. The ground balance function is another great feature to have on a metal detector.
No ground is the same. All ground has varying degrees of mineralisation which can be made up from iron or ferrous oxides. It can also be from wet, salty conditions on beaches for example.
This basically makes the ground look like one massive target that you just can’t get away from. It can overwhelm a detector.
To combat this, the ground balance function when carried out measures certain characteristics of the ground, carries out some complicated maths and basically makes the ground disappear.
Well, it doesn’t actually disappear but it kind of raises a baseline for everything so targets don’t disappear so to speak.

Depending on the make and model of a machine, there are three main ways you can ground balance a metal detector.
The first way is to manually carry it out by pumping the coil (lifting the search coil up and down on the ground).
Making small adjustments via plus and minus buttons, you listen until two tones blend together.
Some people like the manual functionality because it allows them to positively ground balance and give them greater depth but it can be noisy.
The second way is exactly the same but the machine will do it for you in auto mode. You pump the coil the same way for several seconds and the machine will tell you when it’s done.
The third way is what some manufacturers call “ground tracking”.
When this is engaged, the machine will take over all of the ground balancing for you and constantly track the ground conditions making minor adjustments on the fly without you even knowing!
Being properly ground balanced will enable stability and allow you to detect as deep as possible within the machines capability.
You can further read about how deep you really need to detect in my article metal detector depth here.
Threshold
On a metal detector, the “threshold” is the background hum you can hear all of the time. This can normally be adjusted for volume and sometimes the pitch.
The pitch adjustability is good to have as some people have difficulty hearing some pitch levels.
The threshold is useful because if you are using a programme that is set to discriminate some metals, like iron nails for example, when you pass the search coil over that iron nail, the threshold will momentarily disappear and then return.
This helps you indicate that you have passed over something you have discriminated. It’s normal to have this set at a level which is just audible so it doesn’t mask out a possible faint target signal.
Patterns or modes
Patterns or modes differ in name between manufacturers. They are basically pre-set search modes that have been designed by the manufacturer to get the best experience straight out of the box!
The pre-set patterns or modes are the best place to start for a novice because the manufacturer will have carried out some extensive testing of these before setting them into the machine.

These pre-set patterns and modes are the basis for making adjustments as your experience and hunting style is developed.
Typical patterns or modes can be called “Coin”, “Jewellery”, “Coin & Jewellery”, “Relic” and “All metal”.
Other mode names can be called “Beach”, “Gold”, “Basic 1”, “Deus Fast”, “Park” and “Field”.
All of these have pre-set levels of discrimination, number of tones, tone pitches etc.
It’s up to you to then finely adjust for how you wish to hear things.
The overriding thing here is the level of discrimination. A “Coin”, “Coin & Jewellery”, “Park” or “Basic 1” mode will typically have a high level of discrimination because they’ll be used in trashy areas.
All metal
Many machines will have an “All Metal” mode readily available and accessible by a button on the control box labelled “AM” or maybe a picture of a horse shoe. This can also be known as a “Relic” mode.
This instantly puts you into a mode with zero discrimination so the detector will sound off on anything metallic.

You may wonder why people would want this but many sought after artefacts are made of iron. Things like cannon balls or spear heads for example.
People also use this mode when cross checking faint signals as the all metal mode is notoriously the deepest detecting mode you’ll have.
It can very often make a faint signal much stronger.
This is called “modulation”. Signal modulation gives you a fainter signal as a target increases in depth.
A loud signal would be shallow and a faint signal would indicate it’s deep.
(Conversely, a very small shallow target can also give you a faint signal….it’s all practice!)
On one of my old machines, a Whites DFX, this setting could be altered to give you a loud signal whatever the depth!

The Minelab Equinox 800
The ultimate and original multi frequency machine that has opened up a whole new world in detecting technology.
Deep detection and constant stable target identification.
Tones & Tone breaks
These settings allow you to alter how you hear certain targets in relation to their conductivity. Usually, the higher the conductivity of the metal, the higher the tone pitch.
This is so people can have an idea of where the target is coming up on the conductivity scale on their detector. On some basic machines, these tones, their pitches and the number of them will be fixed.
As the detector becomes more expensive, the functionality and adjustability will increase also. You will be able to change the number of tones in the whole scale, the pitch you want to hear them and where you want them to start on stop on the conductivity scale which is known as the “break”.
Personally, being UK based and needing to dig most good target signals, I only hunt in two tones with no discrimination. I have set my first tone break to give me a very low tone or “grunt” on iron and a higher tone for everything else which is non-ferrous.
I have also turned the volume right down on the low tone so I can just about hear all of the iron in the background but have the higher tone at maximum volume.
This way, good targets just pop out and I can hear if a good target is next to iron. This is how adjustable my Minelab Equinox 800 is.
Sensitivity
The sensitivity setting has to be one of the most controversial settings on a detector. It’s also probably one of the most misunderstood and misused of all of the controls on a detector.
The sensitivity setting basically turns up the intensity of the electromagnetic field around the search coil.

It’s true what you may of heard that as a general rule, the higher the sensitivity, the more intense the field and consequently deeper targets will now be detectable within that deeper penetrating field.
It isn’t always the case however and there are mitigating circumstances that is some cases this isn’t always the best course of action.
People can be lured into turning this control higher for greater depth but making their machine run unstable.
In these cases the machines instability and excess noise could quite easily mask the faint signal of a small gold coin for example.
I’ve always liked the analogy of using a cars headlights in fog. You are always able to see better with your headlights on their dipped setting.
If you put them on main beam, you get white out and can’t see. It’s the same with a metal detectors sensitivity and the ground conditions.
The general rule and good practice dictates that you push the sensitivity as high as you can until your machine starts to become erratic or unbalanced.
You then back it down slightly so it just becomes stable. This will be the optimum point for best detecting.
Having the sensitivity too high will just emphasise everything in the ground and drive you insane. You will also lose targets within the unwanted noise.
Pinpoint
The pinpoint function usually is controlled on and off with a button on the control box, most likely with a target or crosshairs icon. The target indicators differ from machine to machine.
There could be coloured LED’s that will centre up when you’re exactly over a target or your screen will change and have some blocks indicate the same.
Whatever the method, you will most likely get a lower pitch rising to a higher pitch as you get closer to the target. The target will then be located under the centre of your search coil.
Frequency
Depending on the make and model of your detector, you may very well have a quick access button on your control box that will allow you to scroll through a search frequency selection that the machine is capable of operating.
Single frequency machines will not have this option however. You can read more about how frequencies work in my article on metal detector discrimination and metal conductivity here.

Typically, on my Minelab Equinox 800, I can toggle through choosing either 5 KHz, 10 KHz, 15 KHz, 20 Khz, 40 KHz or Multi Frequency that uses all of them.
There are some cases in which using a single frequency might be advantageous.
(There is a little trick that involves dropping from Multi down to 10 KHz to check for iron!)
Some detectors can operate multiple frequencies but only one at a time so if you’re after a true multi frequency detector, be extra careful.
You can read more about the advantages of multi frequency technology in my article here.
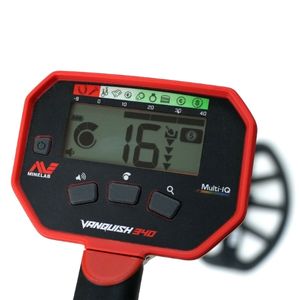
Unbeatable Multi Frequency!
You can now get the ultimate power of multi frequency technology over single frequency detectors with the Minelab Vanquish range of detectors.
The entry level Vanquish 340 now gives you ultimate depth, stability and sensitivity on all target types in every soil, including wet beach sand.
Recovery speed
The more time you spend listening to detectorists and detector talk, you’ll more than likely hear the term “recovery speed”. Depending on the level and sophistication of a machine, this may very well be fixed.
If you have an older machine where this is fixed, it’s a great idea to hunt in an All Metal mode and discriminate with tone differences.
This will speed up the recovery time of your machine because it won’t waste any processing time with discriminating unwanted targets.
Recovery speed is the time taken for a metal detector to process a target during a sweep and then basically get its act together ready to process the next target.
If a recovery speed is slow, second target could be “masked” by the first target. Let me give you a scenario. There are two targets in the ground. The first target is a piece of iron. Very close by, the second target is a nice coin.
If you have a machine with a slow recovery speed and coupled to that, have it set to reject iron, as you pass over the iron and reject it, the machine needs time to process the iron target and may not pick up the coin……does that make sense?
This could be made worse if a concentric coil is being used as both targets could potentially be under the search field at the same time.
You can read more about metal detector coil types in my article here. As technology has advanced, detectors have become much faster and the ability to adjust the recovery speed is available.
This can be useful as recovery speeds want to be increased in iron infested areas to winkle out the good targets. Slower recovery speeds increase depth detection by elongating a target tone.
This usually gets chosen in open and more quiet pasture field situations.
Iron Bias
As far as I am aware at the time of writing this article, the “Iron Bias” function is only available on the Minelab Equinox 600 and 800 detectors. I will paraphrase some parts of this from Minelab as it’s quite complicated.
All iron targets in the ground produce ferrous and non-ferrous responses. This is why you sometimes get low and high tones on an iron object.
This response can increase as the iron object increases in size. The Iron Bias setting allows you to control how you hear the response. A lower setting will allow the natural response to come through.
(the ferrous and non-ferrous response) A higher setting will process the response and identify it more as iron and reduce the non-ferrous high tones.
Final thoughts
We have covered quite a bit today. I originally intended this to be only about typical settings but as I thought more about it, the subject grew into understanding some terminology also.
I hope this has been of help into understanding how detectors works. Stay safe and happy hunting!

The Evolution Pro Cut
The ultimate accessary for the serious metal detectorist. Super strong, stainless steel specially designed spade.